Do you find yourself frustrated with a toilet that flushes slowly or incompletely? It’s not just an inconvenience, it can also be downright embarrassing when guests are over. Fortunately, before calling a plumber, there are several fixes you can try on your own.
The causes of a slow or incomplete toilet flush vary from a clogged trap to low water pressure and even a faulty flapper valve. These issues often arise due to old, worn-out parts and mineral buildup. But don’t worry – armed with the right tools and some know-how, you can easily fix the problem yourself.
In this article, we’ll explore some of the most effective methods for fixing your slow or incomplete toilet flush. From simple remedies like pouring vinegar down the bowl to more complex repairs like replacing the flapper valve, we’ll cover it all. Whether you’re an experienced DIYer or have never fixed a toilet before in your life, we’ve got you covered.
If you’re tired of dealing with this pesky problem, keep reading. We’ll walk you through every step so that you can get back to using your bathroom with confidence once again.
Contents
What Causes Toilet Flushes to be Slow or Incomplete?
We’ve all been there – standing in front of a toilet that just won’t flush properly. It’s a frustrating and inconvenient problem, but fortunately, it’s often easy to fix. In this post, we’ll explore the most common causes of slow or incomplete flushing and offer some tips for resolving them.
One of the most frequent causes of slow or incomplete flushing is a clog in the trap or drain line. This can occur due to a buildup of waste, toilet paper, or other debris that blocks the flow of water. While this problem can sometimes be solved by using a plunger or toilet auger, a severe blockage located deep in the drain line may require professional plumbing services.
Another potential cause of slow flushing is low water pressure. This issue can arise from problems with the water supply to the toilet or obstructions in the water lines. If the problem is with the water supply, it may be necessary to contact your local water utility to resolve it. If the issue is due to obstructions in the water lines, a professional plumber may need to assess and repair the issue.
Faulty components within the toilet itself can also contribute to slow or incomplete flushing. For example, a worn-out flapper valve or fill valve may not allow enough water into the bowl during flushing. In this case, replacing these components may be necessary to restore proper functioning of the toilet.
Overall, it’s essential to understand these common causes of slow or incomplete flushing and address them promptly. Failure to do so could result in more significant plumbing problems down the road.
How to Unclog a Toilet Trap
Understanding the Toilet Trap
You may not know it, but your toilet trap is an essential component of your plumbing system. It’s designed to hold a small amount of water that prevents harmful sewer gases from entering your bathroom. However, when waste, toilet paper, and other debris accumulate in the trap, it can cause slow or incomplete flushing. That’s why it’s crucial to know how to unclog a toilet trap.
Using a Plunger to Unclog the Toilet Trap
The first step in unclogging a toilet trap is using a plunger. Start by removing any standing water with a bucket and filling the bowl with enough water to cover the rubber cup of the plunger. Place the plunger over the hole at the bottom of the toilet bowl and push down firmly to create suction. Then, pull up sharply to create a vacuum that will dislodge the clog. Repeat this process several times until you see water flowing freely down the drain.
Using a Toilet Auger to Unclog the Toilet Trap
If plunging doesn’t work, it’s time to bring out the big guns – a toilet auger. An auger is a long, flexible tool that can reach down into the toilet trap and break up stubborn clogs. Insert the end of the auger into the hole at the bottom of the toilet bowl and turn the handle clockwise until you feel resistance. Then, turn it counterclockwise to back it out and remove any debris.
Precautions When Using a Toilet Auger
As useful as an auger can be, there are some precautions you should take to avoid damaging your toilet. Firstly, make sure you’re using the right type of auger for your toilet, and follow the manufacturer’s instructions carefully. Secondly, use the auger gently and avoid using too much force as this can damage the porcelain or crack the trap itself.
When to Call a Professional Plumber
If neither the plunger nor the auger works to unclog your toilet trap, it’s time to call in the professionals. A clog that’s too stubborn or located further down in the drainpipe may require specialized equipment and expertise to remove. Additionally, if you’re not comfortable using a plunger or auger, it’s always better to err on the side of caution and seek professional help.
In conclusion, a clogged toilet trap can be frustrating, but with the right tools and knowledge, you can fix it. Remember to start with a plunger and move on to an auger if necessary. And always take precautions when using an auger to avoid damaging your toilet.
How to Adjust the Fill Valve
This problem can be caused by a faulty fill valve. The fill valve is responsible for refilling the toilet tank with water after every flush. If the water level is not adjusted correctly, it can lead to a weak or incomplete flush. Don’t worry, you don’t need to hire a professional plumber to fix this issue. Follow these easy steps to adjust the fill valve and restore your toilet’s proper function.
Shut off the water supply by turning the valve located behind the toilet clockwise until it stops. This step is crucial to avoid any water spillage while adjusting the fill valve.
Remove the lid from the toilet tank and locate the fill valve, which is usually on the left side and has a float attached to it. You’ll need to identify if you have a float cup type or a floatless type fill valve.
For the float cup type, adjust the height of the float by squeezing the metal clip and sliding it up or down along the rod until it reaches the desired height. The recommended height is usually marked on the valve or in the toilet manual.
For the floatless type, adjust the water level by turning the adjustment screw clockwise to lower the water level or counterclockwise to raise it. Make sure to turn it slowly and gently to avoid damaging the valve.
Turn on the water supply and let the tank refill. Check to see if the water level is at the correct height, which should be about 1 inch below the top of the overflow tube. If not, repeat steps 3 and 4 until you reach the desired water level.
Test flush your toilet to see if it’s working correctly. If not, make small adjustments until it’s functioning properly.
By following these six simple steps, you can adjust your fill valve and avoid any future issues with slow or incomplete flushing. Remember to always refer to your toilet manual for specific instructions and recommended heights for your particular model of fill valve.
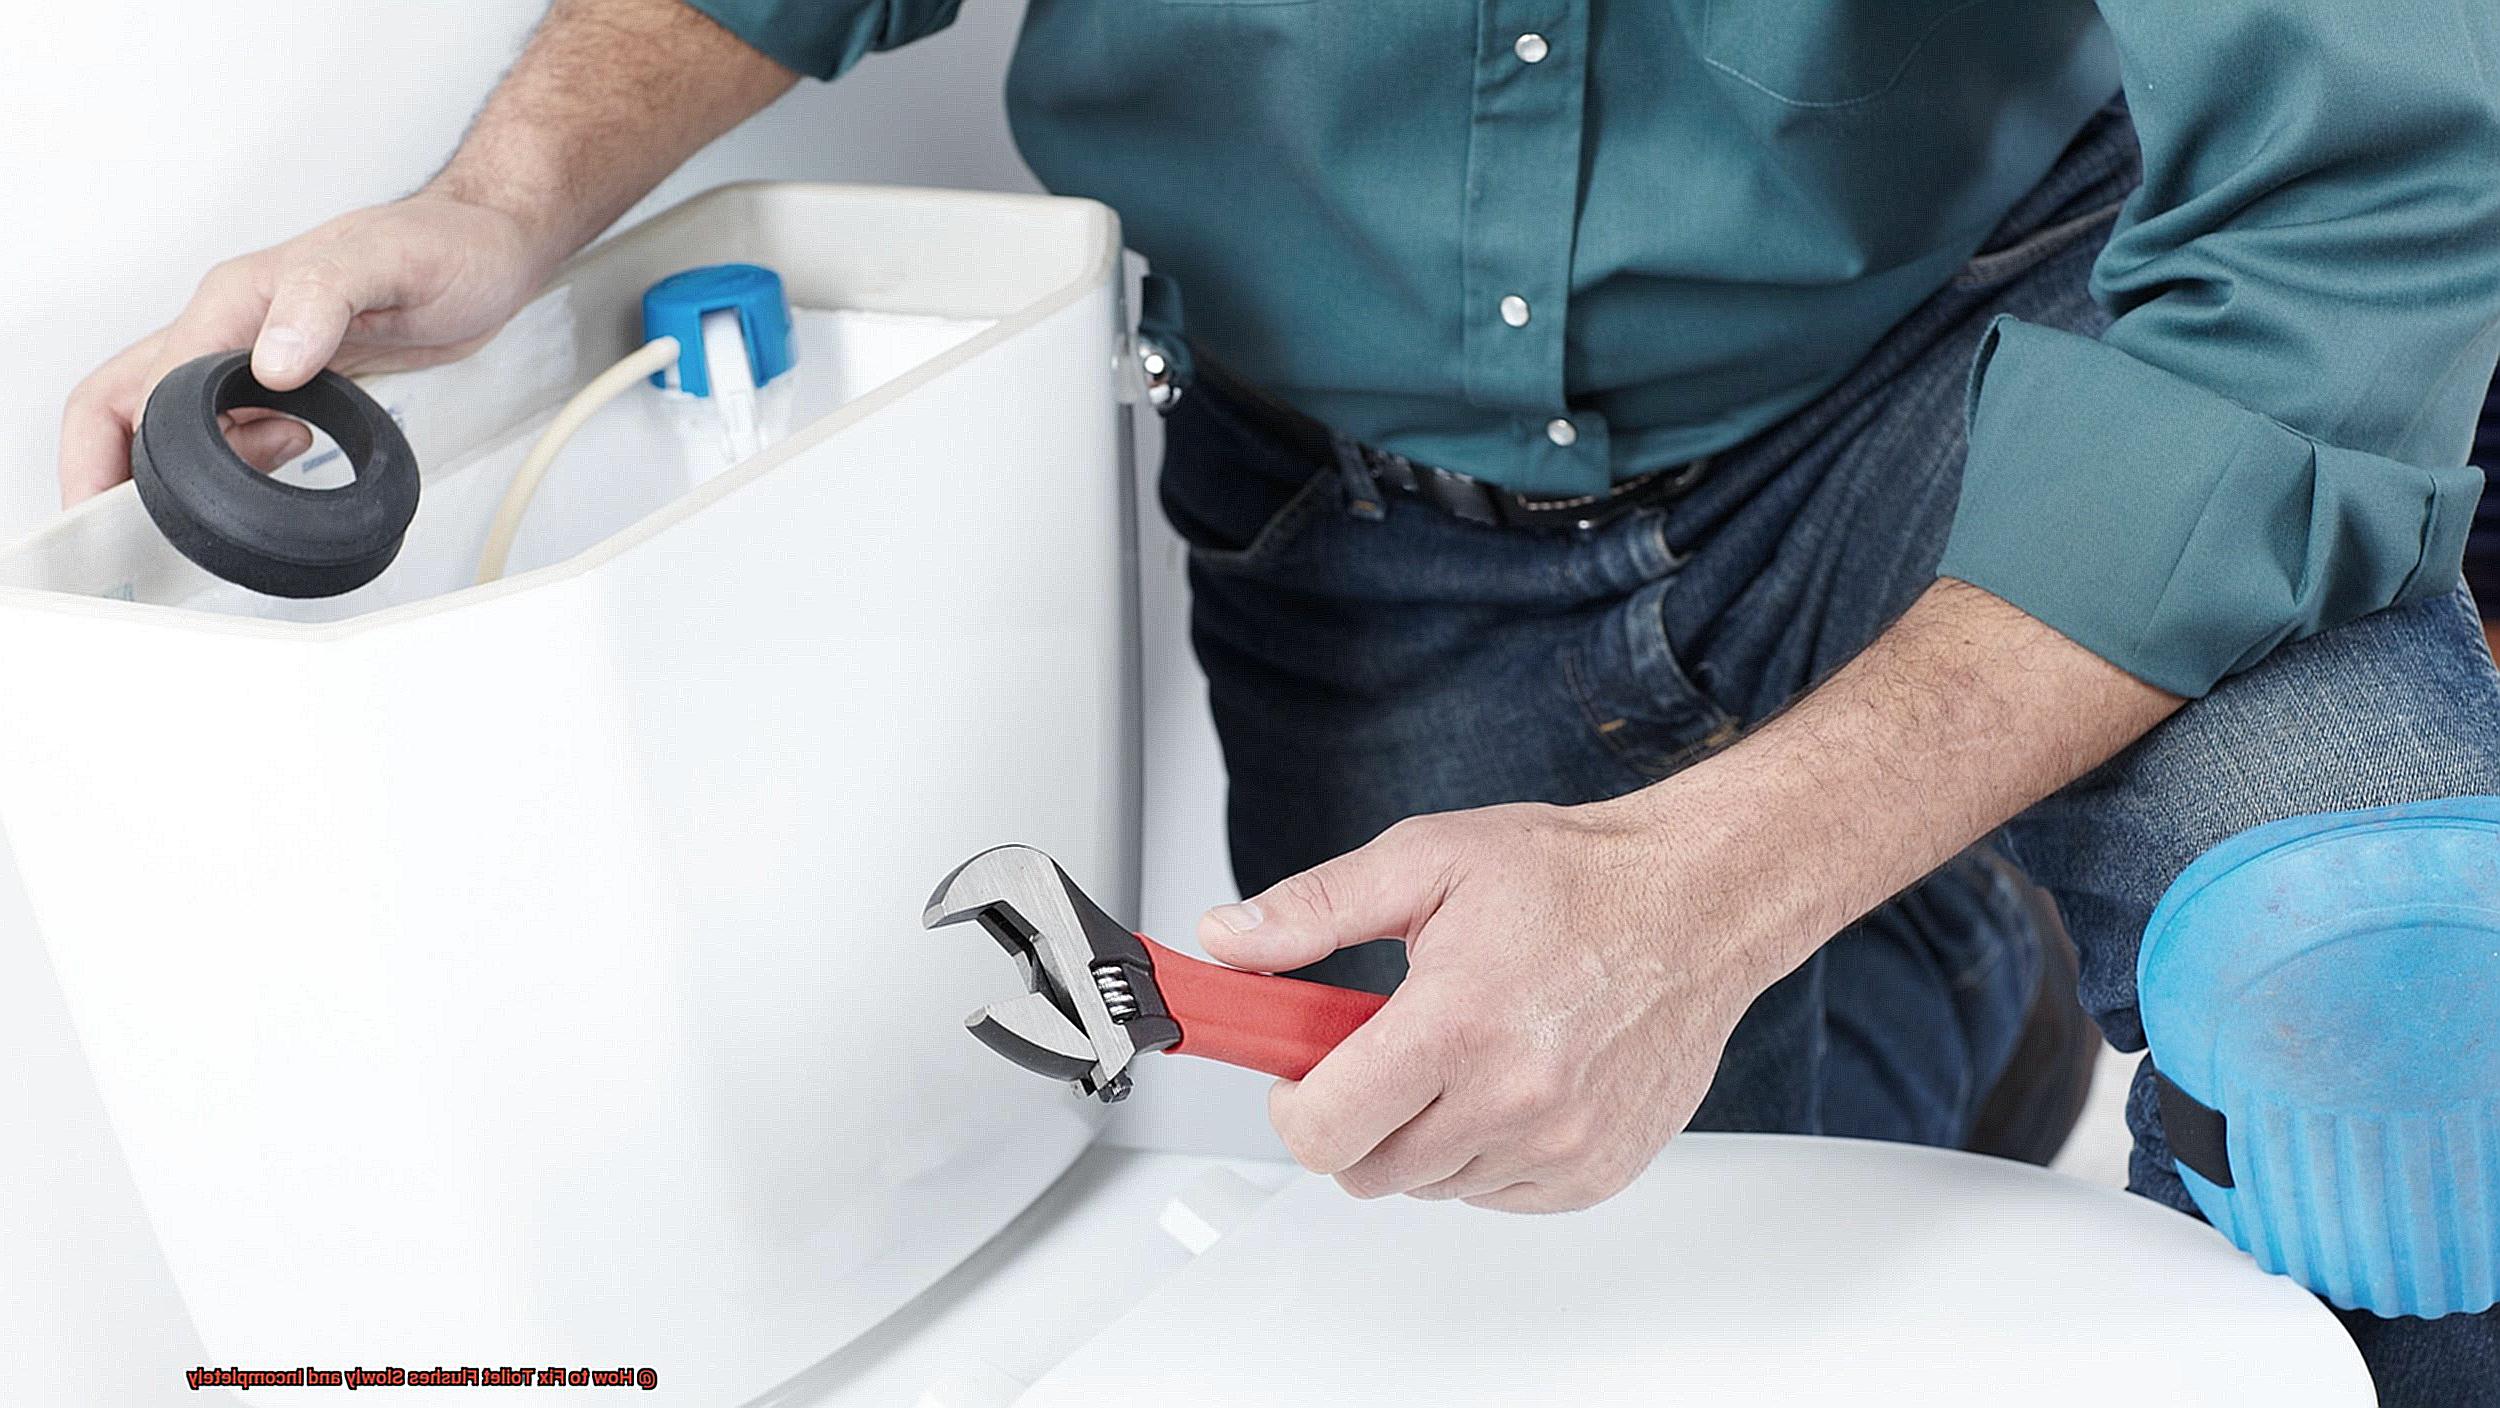
How to Replace a Faulty Flapper Valve
This common issue is often caused by a faulty flapper valve. Not to worry, replacing it can be a simple fix. Here’s how to replace a faulty flapper valve in five easy steps.
Step 1: Turn off the Water Supply
Before starting any repairs, turn off the water supply to your toilet. You can do this by shutting off the valve behind the toilet or at the main water supply. Then, flush the toilet to empty the tank and remove any excess water with a sponge or towel.
Step 2: Remove the Old Flapper Valve
To remove the old flapper valve, either disconnect it from the chain that connects it to the flush lever or lift it off of its hinges. Take note of how it was installed so that you can properly install the new one.
Step 3: Install the New Flapper Valve
It’s important to make sure that the new flapper valve is compatible with your toilet model and size before installing it. Then, place it into position and reattach the chain to the flush lever. Adjust the chain length as needed so that there is enough slack for the flapper valve to fully close but not too much that it gets caught under the valve.
Step 4: Turn on the Water Supply
Now that you’ve installed the new flapper valve, turn on the water supply and fill up the tank. Test out your new flapper valve by flushing your toilet and checking for any leaks or issues.
Step 5: Check for Additional Issues
Replacing just the flapper valve may not solve all issues with slow or incomplete flushing. It’s important to also check other components such as the fill valve or flush handle for any problems.
By following these five easy steps, you can replace a faulty flapper valve and restore your toilet to its normal function.
The Role of Venting Systems in Toilet Flushing
The venting system is responsible for removing air from the plumbing system, creating a vacuum that enables waste and water to flow freely through the pipes. Without proper venting, pressure can build up in the pipes, leading to slow or incomplete toilet flushing. So if you’re experiencing this problem, it’s possible that your venting system is clogged or damaged.
Toilet flushing works like this: when you hit the flush button, water flows from the tank into the bowl, and the force of the water pushes waste through the trap and into the pipes. The venting system then kicks in, removing air from the plumbing system, enabling waste and water to flow effortlessly through the pipes.
Over time, your venting system may become clogged with debris or damaged, leading to slow or incomplete toilet flushing. If you suspect that your venting system is clogged, you can try using a plumbing snake or auger to clear out any debris. If this doesn’t work, it’s best to consult a professional plumber to assess and fix the problem.
It’s essential to note that building codes require venting systems and should never be bypassed or removed. Doing so can lead to serious plumbing problems and potential health hazards due to sewage backup.
So, proper venting is paramount for efficient and effective toilet flushing. If you’re experiencing slow or incomplete flushing, don’t hesitate to reach out to a professional plumber for help.
BNYH0DIoT7k” >
Conclusion
In conclusion, dealing with a slow or incomplete toilet flush can be an inconvenience and even lead to some awkward moments. However, it’s a common issue that doesn’t always require the services of a professional plumber. By understanding the various causes of this problem and following the steps outlined in this article, you’ll be able to fix it yourself in no time.
If you suspect that your toilet trap is clogged, grab your plunger or toilet auger and get to work removing any debris. If that doesn’t do the trick, it may be due to low water pressure or faulty components within the toilet itself. In such cases, adjusting the fill valve or replacing the flapper valve could be necessary.
It’s worth noting that proper venting is essential for efficient and effective toilet flushing. A clogged or damaged venting system can result in sluggish flushing and should never be bypassed or removed.
In summary, maintaining your toilet’s flushing system is crucial for ensuring smooth plumbing function in your home. Armed with the right tools and knowledge, you can easily tackle this pesky problem and regain confidence in your bathroom once again.