Many homeowners search for the best way to seal cracks with silicone, especially if they’re seeing damaging water leaks from the cracks.
But not all caulking companies are the same. Some even offer false promises and overpromise results.
So, why is silicone caulk not curing? Silicone caulk is often sold as an adhesive that is very flexible and can be used in a wide range of situations.
However, it recently became widely known that silicone caulk is not curing properly. This is because silicone is mostly composed of silicon and oxygen.
Oxygen is a gas that does not stick to silicone. This is why silicone caulk requires special additives in order to cure properly.
Unfortunately, the additives used in most silicone caulks have a negative impact on the environment, and some companies have stopped using them because of this.
Because of this, silicone caulk that doesn’t have these environmentally harmful additives is hard to come by.
Contents
Why Is Silicone Caulk Not Curing?
Caulking is often used to seal and waterproof cracks and joints in residential and commercial properties.
Caulk is often made out of silicone or latex, which is a flexible material that expands and contracts with changing temperatures.
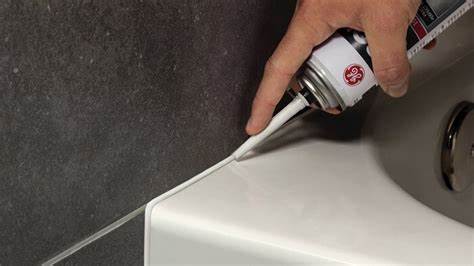
Caulking is often done with caulk guns, which put out a thin bead of silicone or latex that can be quickly put around windows and in cracks in doors, sinks, and pipes.
Caulk guns are commonly used in construction, but they can also be useful around the house. However, caulk guns often cause silicone caulk to not cure.
When caulk is applied with a caulk gun, it is attached to the tip of the gun and squeezed out.
This pushes the caulk out through a narrow, flexible tube, which is attached to a trigger. The trigger is pulled, and the narrow tube pushes the caulk out in a bead of silicone or latex.
The gun uses air pressure to push the caulk out, and it is then applied around the window to seal the window or other crack or joint. Caulking guns are easy to use, but caulking guns often cause silicone caulk to not cure.
When silicone caulk is applied to a surface with a caulk gun, the caulk is pushed out through the narrow tube attached to the trigger.
The tube is attached to the trigger and pushes the caulk out in a bead of silicone or latex. The trigger is pulled, and the bead of caulk hardens around the crack or joint.
Once the caulk has hardened, it forms a watertight seal between the sealant and the surface to which it is applied.
Caulking guns often cause silicone caulk not to cure because the narrow tube pushes the caulk out too quickly.
When silicone caulk is pushed out too quickly, the caulk is not properly applied to the surface and will not form a watertight seal.
When caulking with a caulking gun, it is important to use enough caulk to create a thick bead.
A thick bead of caulk will prevent it from drying before it can be smoothed over the surface of the joint or crack.
When creating a thick bead of silicone or latex caulk with a caulking gun, it is important to move the trigger slowly.
Moving the trigger too quickly will keep the air pressure inside the tube too high, and the caulk will be pushed out too fast.
The caulk will move too quickly, and it will not be smoothed out on the surface of the crack before the surface dries.
How To Dry Silicone Caulk That’s Not Curing
Close The Door And Windows
You should also assist the humidifier by closing the door to your room and closing the windows in the room to allow the humidity in the room to rise without drying out the air in the room.
You’ll need to enclose the room because cold air does not retain as much moisture as warm air does.
Close any open doors or windows to other areas of the house so the air that enters the room from other areas will be warmer and retain more moisture than cold air would.
This will allow the humidifier to work more efficiently and allow your mold problem to be cured more quickly.
Otherwise, it’s probable that the airflow will cause a drier environment, which will lead to you having to repeat the same steps over again.
The best technique is to shut all of the doors and windows in your house, including closet doors and bedroom doors.
Increase The Waiting Period
This is a very important thing to talk about, since you don’t want to hurt your house when you use a humidifier to dry out mold.
In most cases, you will need to wait at least 24 hours before attempting to increase the humidity level in the house above 40%.
You may proceed beyond this step if the conditions in your home seem safe enough to do so.
There is some type of air flow throughout the house, such as from ceiling fans, air ducts, etc.
You need to be patient during this step of cleaning the mold because you don’t want to damage your home while trying to get rid of the mold.
This includes the drywall and flooring of your home, since high humidity levels can cause the wood to warp and the drywall to begin to soften.
Set Up A Humidifier
You should start by shutting off the main water supply to the house and then turn off all of the water valves to the faucets in the house.
This may be a major concern for you if you have small children in the home since you will need to keep the doors shut until all the standing water has drained from the home.
You should give this some thought before you attempt this process since the last thing you want is for your children to be exposed to the contaminated water left behind from the leak.
You will not get the full effect of the humidifier if there isn’t an adequate amount of water for it to do its job.
When trying to dry out a basement that has water damage from flooding or leaking pipes, a humidifier is a great tool to use.
You will get greater outcomes if you are able to hook up a dehumidifier to the HVAC unit in your home since this will allow it to run for a longer period of time.
Monitor The Caulk
The last suggestion is to closely watch the caulking process to see if the surface is drying quickly enough for the rubber sealant to properly cure.
Don’t expect it to dry perfectly and evenly. That’s not going to happen unless you’re willing to use your finger as a squeegee to smooth it out, which kind of defeats the purpose of using a rubber sealant in the first place.
You may need to make a few passes with the nozzle of the caulking gun to make sure all of the crevices are filled and smoothed out, but after that, just give it time to dry—even overnight if the weather conditions are right for it.
Monitoring the silicone caulk, on the other hand, will allow you to see how it’s drying and if it’s taking too long.
What you want to be sure of is that the surface of the material isn’t getting too dry; you don’t want it to harden to the point that it begins to flake off.
Allow the procedure to run its course, and if you’re worried at all that it’s taking too long, remove the nozzle from the bottle and apply some more to the surface. Once the surface starts to dry out again, wait another 15 minutes or so.
If you haven’t seen a difference after about 30 minutes, however, it’s probably time to move on to the next step.
If the caulking job hasn’t cured completely after two hours, there’s probably something wrong with either the material that you’re using or the applicator.
Also Read: Why Is Dust Sticking To Caulk?
Final Words
If silicone caulk is not your thing, you can also use latex caulk or urethane foam to fill the cracks and crevices where the water seeped in.
These products will take longer to cure, though, so make sure that you leave yourself plenty of time to get the job done.
If your silicone caulk isn’t curing fast enough, you may be better off using a different type of sealant, such as polyurethane or urethane foam.
Close the door or window, turn on the humidifier, use a dehumidifier to control the humidity level in the affected room, and monitor the progress of the silicone/latex/urethane sealant to see how the surface dries out.
The findings will most likely vary depending on the temperature and humidity levels in the home; it may take anywhere from 24 hours to a week for the sealants to fully cure and dry out the area.
In certain circumstances, you will need to leave the window open to allow more air to circulate in the room to speed up the drying process.
Allow the humidifier to run in the affected area for several days after you’re done filling the gaps with sealants. This will keep the area as humid as possible to keep the moisture from seeping back in again.
This is how you will repair a small crack in your drywall without having to call a professional.